Overview
This article provides the steps required for you to create a Network Object by using an IP address, this is useful whenever you would like to block traffic to a certain site with an Exinda Policy
Prerequisites
- Admin access to Exinda WebUI
Solution
- Log in to Exinda WebUI
- Navigate to Configuration > Objects > Network > Network Object
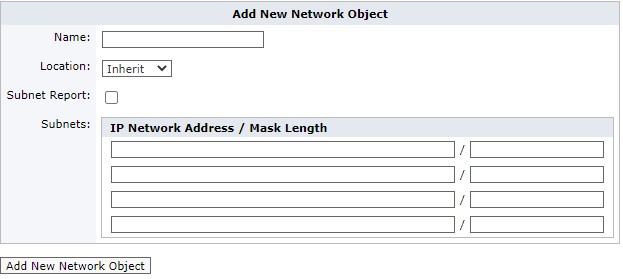
- Fill in the information accordingly:
- Name: Name of the network object
-
Location: Packets are matched to a network object, and the closest subnet within that network object determines the location:
- Internal: All subnets and hosts defined by the network object will be considered on the LAN side of the appliance.
- External: All subnets and hosts defined by the network object will be considered to be on the WAN side of the appliance.
- Inherit: The locations of the subnets and hosts defined by the network object is determined or inherited by the closest match to other network objects.
- Subnet Report: The Detailed Subnet report lists all network activity for Applications, Conversations, Hosts, URLs, and Users on the selected subnets, check this if you would like this network object to appear on this report
-
Subnets: Specify the network IP address and netmask length of the subnet. IPv4 and IPv6 addresses are accepted.
Note: Although only four lines for IP addresses are displayed for a new object, add more IP addresses by saving the network object and click Edit to be presented with an extra 4 lines.
- Click on the Add New Network Object button.
Testing
If you navigate to the Network Objects window (step 2) you will be able to see your network object listed in there

Priyanka Bhotika
Comments